Next: Emulating plucked instruments: Plectrum Up: Reference Manual Previous: Lyrics
So far the creation of accompaniment tracks using drum and chord patterns has been discussed. However, there are times when chording (and chord variations such as arpeggios) are not sufficient. Sometimes you might want a real melody line!
While reading this chapter, don't forget that you can easily add HARMONY to your SOLO tracks (see here for details). You can even import (see MIDIINC here) an existing MIDI track (maybe a melody you've plunked out on a keyboard) and have MMA insert that into your song as a SOLO and apply ARTICULATION and HARMONY to it ... imagine how good you may sound!
MMA has two internal track types reserved for melodic lines. They are the SOLO and MELODY tracks. These two track types are identical with two major exceptions:
These differences mean that you can set parameters for a SOLO track in a preamble in your music file and have those settings valid for the entire song. For example, you may want to set an instrument at the top of a song:
| Solo Voice TenorSax |
On the other hand, MELODY tracks save and restore grooves just like all the other available tracks. If you have the following sequence in a song file:
|
Melody Voice TenorSax
Groove Blues ...musical data |
you should not be surprised to find that the MELODY track is playing with the default voice (Piano) which has been pulled out of the Blues GROOVE.
As a general rule, MELODY tracks have been designed as a “voice” to accompany a predefined form defined in a GROOVE—it is a good idea to define MELODY parameters as part of a GROOVE. SOLO tracks are thought to be specific to a certain song file, with their parameters defined in the song file.
Apart from the exceptions noted above, SOLO and MELODY tracks are identical.
Before you create any SOLO or MELODY tracks you should set the key signature. See here for details on this important setting.
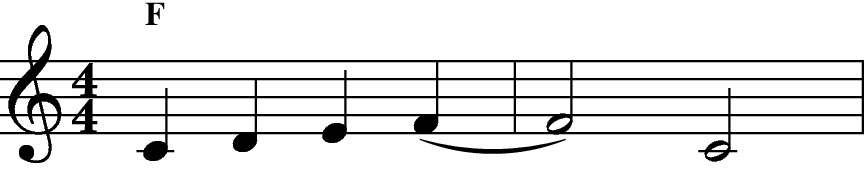
In other available tracks you normally would define a SEQUENCE to play throughout the song. You can do this (see below), but in most cases you specify a series of notes as a RIFF pattern. For example, consider the first two bars of “Bill Bailey” (the details of melody notation will be covered later in this chapter):
|
Solo Riff 4c;2d;4f;
F Solo Riff 4.a;8g#;4a;4c+; F |
In the above example the melody has been inserted into the song with a series of RIFF lines. Specifying a RIFF for each bar of your song can get tedious, so there is a shortcut ... any data surrounded by curly brackets “{ }” is interpreted as a RIFF for a SOLO or MELODY track. This means that the above example could be rewritten as:
|
F {4c;2d;4f;}
F {4.a;8g#;4a;4c+;} |
By default the note data is inserted into the SOLO track. If more than one set of note data is present, it will be inserted into the next track set by the AUTOSOLOTRACKS command (here).
Another method is to use a number of RIFF commands inside a BEGIN/END section. For example:
|
Begin Solo Riff
4c;2d;4f; 4.a;8g#;4a;4c+ End F F |
If you look at the sample songs from our website http://www.mellowood.ca/mma/examples.html you will see this used in many songs to create short introductions.
Warning: The following example will not work:
|
Begin Solo Riff
¡¡Wrong!!
4c;2d;4f; 4.a;8g#;4a;4c+ End |
There are no chord lines defined to go along with the solo. If you compile this short segment MMA will alert you with a “no data generated” message. If all you want is the melody, create “empty” lines with the Z rest special chord.
The notes in a SOLO or MELODY track are specified as a series of “chords”. Each chord can be a single note, or several notes (all with the same duration). Each chord in the bar is delimited with a single semicolon.10.1 Please note the terminology used here! When we refer to a “chord” we are referring to the data a one point in the bar. It might be a single note, a number of notes, or a rest.
Each chord can have several parts. All missing parts will default to the value in the previous chord. The order of the items is important: follow the order below.
The duration can also be set in MIDI ticks (192 ticks equals a quarter note) by appending a “t” or “T” to an integer value. As an example, you could set a quarter note “c” as “4c” or “192tc”. You'll probably never use this option directly, but other parts of MMA can use it to generate solo note data.
Firstly, you can use standard musical notation: the lowercase letters “a” to “g” are recognized, as well as “r” to specify a rest.
Secondly, you can specify a note via its MIDI value. A MIDI value of 60 is the same as a “middle c”.
Important: if you specify a note using a MIDI value that note will not be adjusted for the OCTAVE setting in the track or the key signature; however, TRANSPOSE will be applied.
Thirdly, in the case of Drum Solo Tracks, here, you can use MIDI values or mnemonic values like “SnareDrum1”.
For notes in standard notation (“a” to “g”) the following modifiers are permitted directly after the pitch:
Please note that when you specify a chord in MMA you can use either a “b” or a “&” to represent a flat sign; however, when specifying notes for a SOLO you can only use the “&” character.
Double sharps and flats are not supported.
To make your note data more readable, you can include any number of space and tab characters (which are ignored by MMA ). Individual notes in a chord can be separated by spaces or commas.
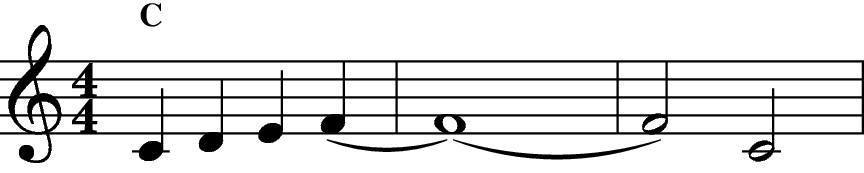
| Solo Notation | |

|
This example shows a few bars of “Bill Bailey” with the MMA equivalent. We've put in commas and spaces to show where they can be, optionally, used.
In order to make SOLOs more versatile, you may extend the notation with options in < > delimiters. Only one set of < >s is permitted for each chord; however, it can be anywhere in the chord (we suggest you place it at the end). If you have more than one pair of commands, separate them with a single comma.
In most cases a short duration is useful for grace notes (16 and 32 seem to work nicely). You can specify a chord or a single note.
The GRACE extension can, optionally, have a “offset modifier”. In most cases you can ignore this (the default is 2). This value is used to calculate the number of MIDI ticks to move the grace note; the duration of the note is divided by the modifier. So, a 16th grace note would be played 24 MIDI ticks early.10.2 If you have multiple grace notes you can use increasing offset modifiers to stretch out the grace notes. For example, to sound three grace notes you could do:
| Solo Riff <grace>16f;<grace=3>f#;<grace=4>g;4g#; |
In this example the first grace note uses a default modifier of 2. Adjusting the durations of the grace notes will have an effect on the offset as well.
Modifiers must be greater than 0.
Notes/chords following the grace note must be given a duration unless you wish to inherit the duration of the grace note.
For a nice example, see the introduction in the sample song dreamsville.mma.
For those who “need to know”, here's how the note duration is determined:
| F {4c; d<ff>; e<Volume=mp,Articulate=80>; f<Articulate=120>;} |
will create a solo line (using an F chord) with the following notes, volumes and articulations:
| Note | Volume | Articulation |
| c | default “mf” | default “100” |
| d | set to “ff” | continues as “100” |
| e | set to “mp” | set to “80” |
| f | continues “mp” | set to “120” |
| 1 F {2f; 2c <offset=198>; } |
would place a half note at beats 1 and 2 of the bar. The second note would overlap the first.
Individual notes or chords can have accents. Unfortunately, in MMA 's text format, we can't use a notation which places the accent over the note, like sheet music does ... so we need a slightly different method. In a SOLO or MELODY line you can have any of the characters “!”, “-”, “ˆ” or “&” between the duration and pitch. All the accents much be in one chunk, without additional characters or spaces.
The following table shows the supported single character accents and their effect:
|
You can use any number of these accents in a set (however, more than 5 becomes useless). Their effects are cummulative.10.3
And example of the usage might be:
| Solo Riff 4a; !ˆ c; !!d; e; |
In this example the second note will have a shorter duration and be louder; the third note will have normal volume, but be quite a bit shorter.
An accent effects only the current note/chord.
Notes tied across bar lines can be easily handled in MMA scores. Consider the following:
It can be handled in three different ways in your score:
|
F {4c;d;e;4+2f;}
F {2r;2c;} |
In this case you MMA will generate a warning message since the last note of the first bar ends past the end of that bar. The rest in the second bar is used to position the half note correctly.
|
F {4c;d;e;4+2f~};
F {2r;2c;} |
This time a ~ character has been added to the end of the first line. In this case it just signals that you “know” that the note is too long, so no warning is printed.
|
F {4c;d;e;4+2f~;}
F {~2c;} |
The cleanest method is shown here. The ~ forces the insertion of the extra 2 beats from the previous bar into the start of the bar.
If you have a very long note, as in this example:
you can have both leading and ending tildes in the same chord; however, to force MMA to ignore the chord you need to include an empty chord marker:
|
C {4c;d;e;4+2f~;}
C {~<>~;} C {~2c;} |
MMA has some built-in error detection which will signal problems if you use a tilde at the end of a line which doesn't have a note held past the end of the current bar or if you use a tilde to start a bar which doesn't have one at the end of the previous bar.
|
Solo Riff 4f; 4f; 4f; 4f;
Solo Riff 4f; f; f; f; Solo Riff 4f; 4; 4; 4; Solo Riff f; ; ; ; Solo Riff 4f; ; ; ; |
One problem which can turn around and bite you when least expected is the use of a default duration with notes specified as MIDI pitch values. This will not work:
| Solo Riff 4 100; 110 ¡¡Wrong!! |
The problem is that for the second chord MMA assumes the value 110 to be a duration. Simple fix is to insert either a “4” or a comma before the second pitch:
| Solo Riff 4 100; ,110 |
If you are copying sheet music notation into a MMA song which uses a TIME setting which is different from the time signature of the sheet music you may find yourself needing to change note values. For example, if you have a march written in 6/8 you will have six eight notes (or combination) per bar; however, if the MMA GROOVE is written with a TIME of 6 beats per bar you would need to convert the sheet music eights to quarters.
The STRETCH option lets you use MMA to do the conversion. In the above example, just use a command like:
| Solo-Trumpet Stretch 200 |
and enter the note values directly from the sheet music. MMA will double the duration of each note.
The argument to STRETCH is a percentage value. So, “200” will double the duration of each note; “50” will halve them.
STRETCH permits arguments in the range “1” to “500”. The value is not saved in GROOVES since it's really just intended as something to be used in a short section of song code.
Note: Internally this command sets a value to modify each generated note. This is done late in the generation of the MIDI data, so you can change the stretch value at any time. It gets complicated, so our recommendation is to ensure you only have one STRETCH in a file.
Most of the timing and volume commands available in other tracks also apply to SOLO and MELODY tracks. Important commands to consider include ARTICULATE, VOICE and OCTAVE. Also note that TRANSPOSE is applied to your note data.
When a “{ }” expression is found in a chord line, it is assumed to be note data and is treated as a RIFF. You can have any number of “{ }” expressions in a chord line. They will be assigned to the tracks specified in the AUTOSOLOTRACKS directive.
By default, four tracks are assigned: Solo, Solo-1, Solo-2, and Solo-3. This order can be changed:
| AutoSoloTracks Melody-Oboe Melody-Trumpet Melody-Horn |
Any number of tracks can be specified in this command, but they must all be SOLO or MELODY tracks. You can reissue this command at any time to change the assignments.
The list set in this command is also used to “fill out” melody lines for tracks set as HARMONYONLY. Again, an example:
|
AutoSoloTracks Solo-1 Solo-2 Solo-3 Solo-4
Solo-2 HarmonyOnly 3Above Solo-3 HarmonyOnly 8Above |
Of course, some voicing is also set ... and a chord line:
| C {4a;b;c;d;} |
The note data {4a;b;c;d;} will be set to the Solo-1 track. But, if you've not set any other note data by way of RIFF commands to Solo-2 and Solo-3, the note data will also be copied to these two tracks. Note that the track Solo-4 is unaffected since it is not a HARMONYONLY track. This feature can be very useful in creating harmony lines with the harmonies going to different instruments. The supplied file egs/harmony.mma shows an example.
To save some typing, you can have empty sets of {} as placeholders. For example, assume you have three SOLO tracks:
| AutoSoloTracks Solo-Violin Solo-Viola Solo-Cello |
and you don't use the Viola in a section. Doing something like:
|
C {4a;b;c;d;} {} {1+1g }
G {4g;b;} {} {} |
is fine. Note how the Cello has a long note over two bars and the Viola has no notes at all.
A solo or melody track can also be used to create drum solos. The first thing to do is to set a track as a drum solo type:
| Solo-MyDrums DrumType |
This will create a new SOLO track with the name Solo-MyDrums and set its “Drum” flag. If the track already exists and has data in it, the command will fail. The MIDI channel 10 is automatically assigned to all tracks created in this manner. You cannot change a “drum” track back to a normal track.
These is no limit to the number of SOLO or MELODY tracks you can create ... and it probably makes sense to have several different tracks if you are creating anything beyond a simple drum pattern.
Tracks with the “drum” setting ignore TRANSPOSE and HARMONY settings.
The specification for pitches is different in these tracks. Instead of standard notation pitches, you must specify a series of drum tone names or MIDI values. If you want more than one tone to be sounded simultaneously, create a list of tones separated by commas.
Some examples:
| Solo-MyDrums Riff 4 SnareDrum1; ; r ; SnareDrum1; |
would create a snare hit on beats 1, 2 and 4 of a bar. Note how the second hit uses the default tone set in the first beat.
| Solo-MyDrums Riff 8,38;;;; |
creates 4 hits, starting on beat 1. Instead of “names” MIDI values have been used (“38” and “SnareDrum1” are identical). Note how “,” is used to separate the initial length from the first tone.
| Solo-MyDrums Riff 4 SnareDrum1,53,81; r; 4 SideKick ; |
creates a “chord” of 3 tones on beat 1, a rest on beat 2, and a “SideKick” on beat 3.
Using MIDI values instead of names lets you use the full range of note values from 0 to 127. Not all will produce valid tones on all synths.
To make the use of solo drum tracks a bit easier, you can use the the TONE command to set the default drum tone to use (by default this is MIDI value 38 or SnareDrum1). If you do not specify a tone to use in a solo the default will be used.
You can access the default tone by using the special Tone “*”. In the following example:
|
Begin Solo-Block
DrumType Tone LowWoodBlock End ... Solo-Block Riff 4r; SnareDrum; * ; ; ... Solo-Block Riff 4;;;; |
The first solo created will have a rest on beat 1, a SnareDrum on beat 2 and LowWoodBlock on beats 3 and 4. The second will have LowWoodBlock on each beat.
When the DRUMTYPE option is parsed, the VOICE for the track will be set to the default setting. Normally, this is voice “0”. To change the voice you must do so after setting DRUMTYPE since the option resets the voice to the default. Get in the habit of setting the VOICE after setting up a DRUMTYPE track. In most cases you'll not be setting the VOICE and this will not be an issue.
It is fun and simple to arpeggiate notes in a SOLO or MELODY track. For example:
| Solo-Guitar Arpeggiate Direction=Up Rate=32 Decay=-4 |
will take the notes in the SOLO-GUITAR track and arpeggiate them as a series of 32nd notes. Each successive note's velocity will be decremented by 4 Enabling a HARMONY (or the entry of multiple notes by the user) is needed for meaningful effects ... arpeggiating over a single note isn't the nicest sound (but it works). For this to sound musical, you will have to experiment with the various options and the track ARTICULATE setting. For an interesting (weird) effect try a long RATE combined with MALLET.
Each option for this command must be entered in the OPTION=VALUE format.
You can set a SEQUENCE in a MELODY or SOLO track. Sequences work just like they do in other tracks. There are some advantages to this: you can use the mnemonic notation outlined above; and you can easily import existing MIDI tracks to use as sequences (see here). Some examples are included in the directories egs/solo and egs/midi-inc/mid2seq in the distribution.
To set a sequence use the note name format described above. Anything valid in a RIFF is valid in a sequence. For example:
|
Begin Melody-AltoSax
Voice AltoSax Voicing FollowChord=On FollowKey=Off Root=C Articulate 60 Harmony OpenAbove Sequence { 4.c;8;4g;;} {2c;g;} {4c;;g;;} {8c;;;;d;e;4d;} Octave 5 End |
will create a simple bass line.
You can create multi-bar sequences using {}s just like in other tracks:
| Melody-Bass Sequence {4c;g;c;g;}{2c;} |
Note the use of various VOICING options in the above example.
These VOICING commands only apply to MELODY and SOLO tracks.10.4 Each option is set as an OPTION=VALUE pair.
This option should be enabled when using a sequence pattern. It should be disabled (default) when using a solo riff.
In most, if not all, cases you should set this to OFF when using SEQUENCE patterns in a SOLO or MELODY track; set it to ON (the default) when using a solo RIFF.
Regardless of the setting, explicit accidentals in the pattern are honoured as detailed earlier in this section. You should specify explicit accidentals in a pattern used as a sequence in a SOLO or MELODY track. Again, as mentioned above, pitches specified as MIDI values are unaffected by the key signature.
SOLO tracks are not saved as part of a GROOVE. For this reason SEQUENCE is mostly used in a MELODY track; using it in a SOLO track will generate a warning.